Saturday, 12 July 2014

Impact of Sitecore Aliases on SEO

4 comments
Today I’ve noticed a post in Sitecore SDN forum regarding impact of Sitecore Aliases on SEO. While answering to the post; I thought it'd be better to turn it into a Blog post with more detail. :)

From SEO point of view, using aliases in Sitecore is not good option. The main reason is multiple URLs will be created for a single page URL. This in turn shows up in Google search engine as two pages and will consider as duplicate content. Search engines try to index pages with distinct and unique content. Duplicate content affects adversely the hits for the page in the results rankings. So it will be better to avoid aliases in Sitecore whenever possible.

No redirect (no 301 or 302 HTTP status code) happens when you are using aliases in Sitecore. You can monitor HTTP status code and web traffic using Fiddler.  Suppose you’ve created aliases for a Sitecore item /sitecore/content/Home/sample/sample1/sample2 as sampleitem. If you open www.yourwebsite.com/sample/sample1/sample2 then you will see HTTP status code as 200 and if you open www. yourwebsite.com/sampleitem then also you will see HTTP status code as 200 which means that we are having two URLs which is generation same content (duplicate content).

Set canonical URL link into the head of the page whenever you are using aliases in Sitecore. Using canonical URLs to improve link and ranking signals for content available through multiple URL structures is recommended practice.

How to implement Canonical URL link in Sitecore:

Override AliasResolver processor in HttpRequest pipeline and write custom logic to handle aliases and generate canonical link. In web.config you will see below line related to AliasResolver processor:
<processor type="Sitecore.Pipelines.HttpRequest.AliasResolver, Sitecore.Kernel" />
Below is the custom code for CustomAliasResolver:
using Sitecore;
using Sitecore.Links;
using Sitecore.Pipelines.HttpRequest;
using System.Web;

namespace Sitecore.Ramblings
{
    public class CustomAliasResolver : Sitecore.Pipelines.HttpRequest.AliasResolver
    {
        public CustomAliasResolver()
        {
        }

        public override void Process(HttpRequestArgs args)
        {
            base.Process(args);
            if (Context.Item != null)
            {
                string href = "{0}://{1}{2}";
                args.Context.Items["CanonicalUrl"] = string.Format(href, HttpContext.Current.Request.Url.Scheme, HttpContext.Current.Request.Url.Host, LinkManager.GetItemUrl(Context.Item));
            }
        }
    }
}
Modify web.config as below:
<!--<processor type="Sitecore.Pipelines.HttpRequest.AliasResolver, Sitecore.Kernel" />-->
<processor type="Sitecore.Ramblings.CustomAliasResolver, SitecoreRamblings" />
The type format is “<namespace>.<class name>, <assembly name>”. For example: Sitecore.Ramblings is namespace, CustomAliasResolver is class name and SitecoreRamblings is assembly name.

Now in the header control or in layout of your website check whether HttpContext.Current.Items["CanonicalUrl"] is not null and set canonical URL into the head of page. Below is the sample code to set canonical URL in layout of Sitecore MVC website.
@if (Context.ApplicationInstance.Context.Items["CanonicalUrl"] != null)
    {
 <link rel="canonical" href="@Context.ApplicationInstance.Context.Items["CanonicalUrl"].ToString()" />
    }
Comments and suggestions are most welcome. Happy coding! 
Read More...

Wednesday, 9 July 2014

Find all the items that are referring to particular item in Sitecore

24 comments
In this blog post I am going to explain how to get all the items (referrers) which are referring to a particular item (may be template, sublayout or rendering etc.) in Sitecore. There are few ways to achieve this goal:
  1. Using Sitecore Content Editor UI
  2. Writing custom C# code
  3. Using Sitecore Powershell Console Module
  • Using Sitecore Content Editor UI: The simplest way of seeing these referrer links is to go to that particular item and go to the Navigation Strip and then click on Links. This should show you all the items (referrers) that point to this current item and all the items that the current items points to (references).
  • Writing custom C# code: Below function GetReferrers(string itemId) takes item id as input parameter and return the list of items which are pointing to this particular item.
    public Item[] GetReferrers(string itemId)
            {          
                Item item = Sitecore.Data.Database.GetDatabase("master").GetItem(new Sitecore.Data.ID(itemId));
                // getting all linked Items that refer to the Item
                ItemLink[] itemLinks = Globals.LinkDatabase.GetReferrers(item);
                if (itemLinks == null)
                {
                    return null;
                }
                else
                {
                    ArrayList items = new ArrayList(itemLinks.Length);
                    foreach (ItemLink itemLink in itemLinks)
                    {
                        // comparing the database name of the linked Item
                        if (itemLink.SourceDatabaseName == "master")
                        {
                            Item linkItem = Sitecore.Data.Database.GetDatabase("master").Items[itemLink.SourceItemID];
                            if (linkItem != null)
                            {
                                items.Add(linkItem);
                            }
                        }
                    }
                    return (Item[])items.ToArray(typeof(Item));
                }
            }
    
  • Using Sitecore Powershell Console Module: Download Sitecore Powershell Console Module from Sitecore MarketPlace and install the package. Go to Start > Development Tools > PowerShell ISE.

    Enter below powershell script in script field and execute.
    $props = @{
       InfoTitle = "Referrers"
        InfoDescription = "Lists all items that are using this item"
        PageSize = 25
    }
    
    function Get-ItemReferrers {
        $item = Get-Item -Path "/sitecore/templates/Launch Sitecore/Job Function"
        $linkDb = [Sitecore.Globals]::LinkDatabase
        $links = $linkDb.GetReferrers($item)
        foreach($link in $links){
            $linkedItem = Get-Item -Path master:\ -ID $link.SourceItemID
            $linkedItem
        }
    }
    
    $items = Get-ItemReferrers
    $items | Show-ListView @props -Property @{Label="Name"; Expression={$_.DisplayName} },
                @{Label="Updated"; Expression={$_.__Updated} },
                @{Label="Updated by"; Expression={$_."__Updated by"} },
                @{Label="Created"; Expression={$_.__Created} },
                @{Label="Created by"; Expression={$_."__Created by"} },
                @{Label="Path"; Expression={$_.ItemPath} }
    
    Close-Window
    
Above approaches require that Link Database should be up to date. Link database should be updated automatically but you can force rebuild command manually. Go to Start > Control Panel > Databases > Rebuild Link Database
Sitecore Powershell References:
  1. Blog by Adam Najmanowicz 
  2. Blog by Michael West 
  3. How to create custom report using PowerShell blog by Mike Reynolds
Comments and suggestions are most welcome. Happy coding!
Read More...

Sunday, 6 July 2014

Customizing Page Editor Ribbon in Sitecore : Part 3

5 comments
In my previous blog post; I’ve explained how to customize Sitecore Page Editor Ribbon by using predefined webedit:fieldeditor command. In this blog post I am going to discuss how to write custom code for click command.
  1. Create a new large button item Edit Meta Data by using template /sitecore/templates/System/Ribbon/Large Button under /sitecore/content/Applications/WebEdit/Ribbons/WebEdit/Page Fields/Hidden Fields path. Update Header field to specify button name and enter unique id with no white spaces in ID field. Tooltip is used to display a short description when a user points at the button. Type a char in Access Key and you can access your button by pressing [alt] + [Access key]. Content tree of core database should look like as below figure:
  2. Open visual studio and create a new class CustomFieldEditor and inherit Sitecore.Shell.Applications.WebEdit.Commands.FieldEditorCommand class. Write below code in class.
    using Sitecore;
    using Sitecore.Data.Items;
    using Sitecore.Diagnostics;
    using Sitecore.Shell.Framework.Commands;
    using Sitecore.Web;
    using Sitecore.Web.UI.Sheer;
    using System;
    using System.Collections.Generic;
    using System.Collections.Specialized;
    using System.Linq;
    using System.Web;
    
    namespace Sitecore.Ramblings
    {
        public class CustomFieldEditor : Sitecore.Shell.Applications.WebEdit.Commands.FieldEditorCommand
        {
            /// <summary>
            /// The name of the parameter in <c>ClientPipelineArgs</c> containing 
            /// Sitecore item identification information.
            /// </summary>
            private const string URI = "uri";
    
            public override void Execute(CommandContext context)
            {
                Assert.ArgumentNotNull(context, "context");
                if (context.Items.Length >= 1)
                {
                    ClientPipelineArgs args = new ClientPipelineArgs(context.Parameters);
                    args.Parameters.Add("uri", context.Items[0].Uri.ToString());
                    if (args.Parameters["fields"] == String.Empty) { args.Parameters.Add("fields", context.Parameters["fields"]); }
                    Context.ClientPage.Start(this, "StartFieldEditor", args);
                }
            }
    
            /// <summary>
            /// Gets the configured Field Editor options. Options determine both the look of Field Editor and the actual fields available for editing.
            /// </summary>
            /// <param name="args">The pipeline arguments. Current item URI is accessible as 'uri' parameter</param>
            /// <param name="form">The form values.</param>
            /// <returns>The options.</returns>
            /// <example>
            /// ItemUri uri = ItemUri.Parse(args.Parameters["uri"]);
            /// Item item = Database.GetItem(uri);
            /// var options = new PageEditFieldEditorOptions(form, new List&lt;FieldDescriptor&gt; {
            /// new FieldDescriptor(item, "Title"),
            /// });
            /// options.Title = "Field Editor Test";
            /// options.Text = "Tests the Mini Content Editor system";
            /// options.Icon = "people/16x16/cubes_blue.png";
            /// return options;
            /// </example>
            protected override Sitecore.Shell.Applications.WebEdit.PageEditFieldEditorOptions GetOptions(Sitecore.Web.UI.Sheer.ClientPipelineArgs args, NameValueCollection form)
            {
                Sitecore.Diagnostics.Assert.IsNotNull(args, "args");
                Sitecore.Diagnostics.Assert.IsNotNull(form, "form");
                Sitecore.Diagnostics.Assert.IsNotNullOrEmpty(args.Parameters[URI], URI);
                Sitecore.Data.ItemUri uri = Sitecore.Data.ItemUri.Parse(args.Parameters[URI]);
                Sitecore.Diagnostics.Assert.IsNotNull(uri, URI);
                Sitecore.Diagnostics.Assert.IsNotNullOrEmpty(args.Parameters["fields"], "Field Editor command expects 'fields' parameter");
                Sitecore.Diagnostics.Assert.IsNotNullOrEmpty(args.Parameters["command"], "Field Editor command expects 'command' parameter");
                string flds = args.Parameters["fields"];
                string coreItemId = args.Parameters["command"];
    
                Sitecore.Data.Items.Item item = Sitecore.Data.Database.GetItem(uri);
                Sitecore.Diagnostics.Assert.IsNotNull(item, "item");
                Item coreItem = Client.CoreDatabase.GetItem(coreItemId);
                Assert.IsNotNull(coreItem, "command item");
    
                List<Sitecore.Data.FieldDescriptor> fields = new List<Sitecore.Data.FieldDescriptor>();
    
                foreach (string fieldName in flds.Split('|'))
                {
                    if (item.Fields[fieldName] != null)
                    {
                        fields.Add(new Sitecore.Data.FieldDescriptor(item, item.Fields[fieldName].Name));
                    }
                }
    
                // Field editor options.
                Sitecore.Shell.Applications.WebEdit.PageEditFieldEditorOptions options = new Sitecore.Shell.Applications.WebEdit.PageEditFieldEditorOptions(form, fields);
                options.PreserveSections = false;
                options.DialogTitle = coreItem.Fields["Header"].Value;
                options.Icon = coreItem.Fields["Icon"].Value;
                options.Title = coreItem.Fields["Header"].Value;
    
                return options;
            }
    
            /// <summary>
            /// Determine if the command button should be displayed or hidden.
            /// </summary>
            public override CommandState QueryState(CommandContext context)
            {
                if (WebUtil.GetQueryString("mode") != "edit")
                {
                    return CommandState.Hidden;
                }
                return CommandState.Enabled;
            }
        }
    
    }
  3. Define command definition in App_Config/Commands.config file as below:
    <command name="cutomsitecore:customfieldeditorbutton" type="Sitecore.Ramblings.CustomFieldEditor, SitecoreRamblings"/>
    Few important things here to note are:
    • Command name should be in lower case. For example: cutomsitecore:customfieldeditorbutton
    • The type format is “<namespace>.<class name>, <assembly name>”. For example: Sitecore.Ramblings is namespace, CustomFieldEditor is class name and SitecoreRamblings is assembly name.
    • This type is the link to the class which inherits the field editor command class (Sitecore.Shell.Applications.WebEdit.Commands.FieldEditorCommand).
  4. Write below line in Click field of Edit Meta Data (Large Button):
    cutomsitecore:customfieldeditorbutton(fields=Browser Title|Meta Tag|Meta Description,command={5D7A9F2B-9EB5-429B-AA08-DC743A7189E0})
    First argument fields is pretty much understandable. You have to specify field names that should be shown in the field editor separated with “|” (pipe symbol). You have to enter GUID of Edit Meta Data (Large Button) along with command parameter.
  5. Browse the page in edit mode and you will see new customized button in ribbon.
Comments and suggestions are most welcome. Happy coding!
Read More...

Customizing Page Editor Ribbon in Sitecore : Part 2

4 comments
In my previous post I’ve given introduction about Customizing Sitecore Page Editor Ribbon. In this post; I’ll explain step by step how to customize Sitecore Page Editor Ribbon. The definition for the Sitecore Page Editor Ribbon is located in the Core database. The path is /Sitecore/Content/Applications/WebEdit/Ribbons/WebEdit.
  1. Create a new strip item Page Fields by using template /sitecore/templates/System/Ribbon/Strip under /Sitecore/Content/Applications/WebEdit/Ribbons/WebEdit path. Update Header field to specify strip name and enter unique id with no white spaces in ID field. Tooltip is used to display a short description when a user points at the strip. Type a char in Access Key and you can access your strip by pressing [alt] + [Access key]. In below example you can access strip by pressing alt+p.
  2. Create a new chunk item Hidden Fields by using template /sitecore/templates/System/Ribbon/Chunk  under /sitecore/content/Applications/WebEdit/Ribbons/WebEdit/Page Fields path. Update Header field to specify chunk name and enter unique id with no white spaces in ID field. Tooltip is used to display a short description when a user points at the chunk. Type a char in Access Key.
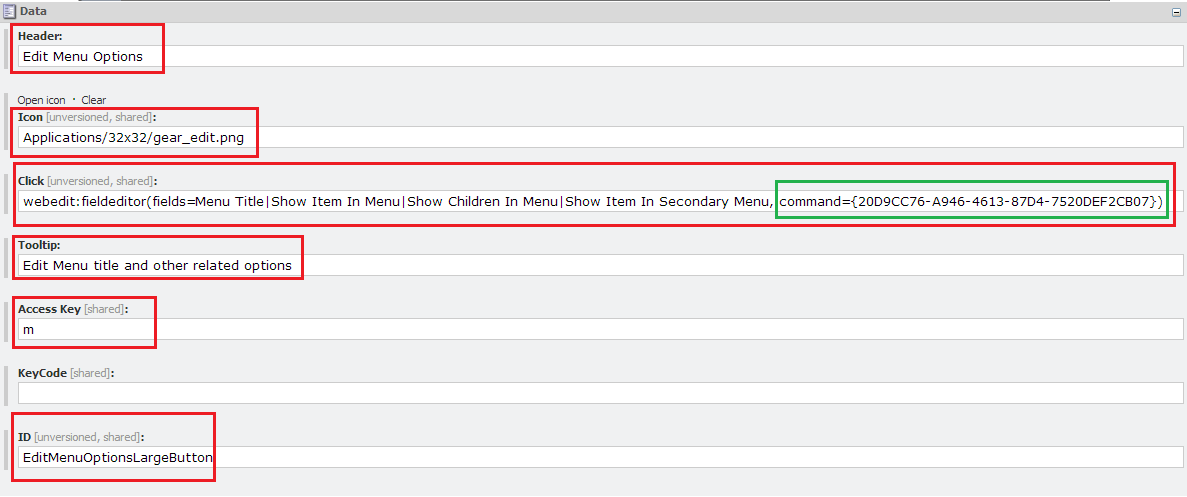
  3. Create a new large button item Edit Menu Options by using template /sitecore/templates/System/Ribbon/Large Button under /sitecore/content/Applications/WebEdit/Ribbons/WebEdit/Page Fields/Hidden Fields path. Update Header field to specify button name and enter unique id with no white spaces in ID field. Tooltip is used to display a short description when a user points at the button. Type a char in Access Key and you can access your button by pressing [alt] + [Access key]. Content tree of core database should look like as below figure:
  4. Now the main task is triggering click command on Edit Menu Options button click and load the field editor by specifying a parameterized command in the Click field. There are two ways of configuring click event:
    • Use predefined webedit:fieldeditor command
    • Writing custom code for click command
  5. In this blog post; I’ll be explaining first approach by implementing Edit Menu Options button. How to write custom code for click command will be explained in next blog post by implementing Edit Meta Data button.
  6. We don’t have to write a single line of code by using predefined webedit:fieldeditor command. This command is built-in Field Editor command which is invoked by Field Editor Button based buttons. You can see definition of this command in App_Config/Commands.config file.
    <command name="webedit:fieldeditor" type="Sitecore.Shell.Applications.WebEdit.Commands.FieldEditor, Sitecore.Client"/>
  7. Write below line in Click field of Edit Menu Options (Large Button):
    webedit:fieldeditor(fields=Menu Title|Show Item In Menu|Show Children In Menu|Show Item In Secondary Menu, command={20D9CC76-A946-4613-87D4-7520DEF2CB07})
    First argument fields is pretty much understandable. You have to specify field names that should be shown in the field editor separated with “|” (pipe symbol). You have to enter GUID of Edit Menu Options (Large Button) along with command parameter.
  8. Browse the page in edit mode and you will see new customized button in ribbon.
Comments and suggestions are most welcome. Happy coding!
Read More...

Customizing Page Editor Ribbon in Sitecore : Part 1

2 comments
In this blog post I am going to explain how to customize Sitecore Page Editor Ribbon in Sitecore. This topic is going to be a bit lengthy so I’ve decided to complete this topic in three blog posts.
  1. Customizing Page Editor Ribbon in Sitecore : Part 1
  2. Customizing Page Editor Ribbon in Sitecore : Part 2
  3. Customizing Page Editor Ribbon in Sitecore : Part 3
Let’s start with brushing up common fundamentals related to Sitecore Page Editor Ribbon Components.
Recently I’ve come across a situation where I need to allow content editors who were using the Sitecore Page Editor to edit some hidden page-level fields like Page Title, Meta Keywords, Meta Description and various Menu options. Thus I’ve decided to add some custom additional buttons in Sitecore Page Editor Ribbon in order to modify these fields. Adding additional buttons in Sitecore Page Editor Ribbon is good idea as these fields will never be displayed and don’t belong to any specific component. The definition for the Sitecore Page Editor Ribbon is located in the Core database. The path is /Sitecore/Content/Applications/WebEdit/Ribbons/WebEdit.
I’ll create one new strip Page Fields. Underneath this strip, I’ll be adding one new chunk (Hidden Fields) and two large buttons (Edit Meta Data and Edit Menu Options) in Sitecore Page Editor Ribbon. Clicking the Edit Meta Data button and Edit Menu Options button opens a field editor with relevant the fields which allows content editors to modify page-level fields.

With these additions to the ribbon, the content editors no longer have to open the Sitecore Content Editor to modify page-level fields that are not visible. In the next blog post I’ll explain step by step how to customize Sitecore Page Editor Ribbon.

Comments and suggestions are most welcome. Happy coding!
Read More...