Sunday 22 March 2015

Input Text Box Field for Data Source of rendering is missing

2 comments
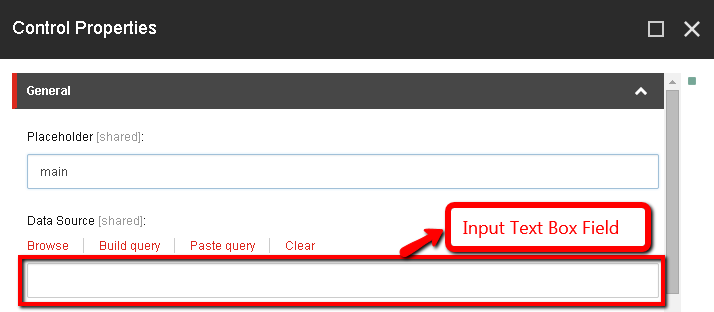
Recently I’ve been involved into upgradation of existing Sitecore 6.6 solution to Sitecore 8 experience platform. After the upgradation; I’ve noticed one strange issue.  I was unable to change the data source of a rendering because the input text box field for data source of rendering was missing. See below screenshot:
Initially I thought that some changes had been made to the Data Source field in the Core database. The Data Source field is located in core database at location /sitecore/system/Field types/System Types/Datasource. I compared Data Source field of upgraded Core database to Core database of fresh Sitecore 8 installation and I didn’t find any difference in Data Source field after comparison. I’d also verified permission on the Data Source field of Core database and everything looks fine to me.

I kept on troubleshooting the issue and I compared configuration (/sitecore/admin/showconfig.aspx) of upgraded Sitecore solution to fresh Sitecore 8 solution. After comparison I have found that somehow Sitecore.Buckets.config file in App_Config\Include folder was missing.
<processor type="Sitecore.Buckets.FieldTypes.CustomDataSource, Sitecore.Buckets" patch:source="Sitecore.Buckets.config"/>
<source mode="on" namespace="Sitecore.Buckets.FieldTypes" assembly="Sitecore.Buckets" prefix="contentExtension" patch:source="Sitecore.Buckets.config"/>
I added Sitecore.Buckets.config in the App_Config/Include folder and input text box field for data source of rendering was enabled now.
Comments and suggestions are most welcome. Happy coding!   
Read More...

Friday 20 March 2015

Error: Load Denied by X-Frame-Options while opening Sitecore Content Editor

Leave a Comment
Recently I’ve faced strange issue while working with one Sitecore.NET 7.0.(rev. 130810) solution.  I was unable to open Sitecore content editor. I’ve checked console window to verify if there are any errors. I was getting error: “Error: Load Denied by X-Frame-Options

I’ve troubleshoot the error and found below piece of code in global.asax.cs file:
protected void Application_PreSendRequestHeaders()
        {
            Response.Headers.Remove("Server");
            Response.Headers.Remove("X-AspNet-Version");
            Response.Headers.Remove("X-AspNetMvc-Version");
            Response.AddHeader("X-Frame-Options", "DENY");
        }
Above code logic was added to enhance the security of web application. X-Frame-Options is a good additional layer of protection to prevent clickjacking on your site.  Response.AddHeader("X-Frame-Options", "DENY") was causing the actual issue. DENY option means that  the page can never be framed by any page, including a page with the same origin hence content editor was not opening. I’ve changed Response.AddHeader("X-Frame-Options", "DENY") to Response.AddHeader("X-Frame-Options", "SAMEORIGIN") and I was no longer getting any error while opening content editor. SAMEORIGIN option means that the page can be framed, but only by another page with the same origin.

Comments and suggestions are most welcome. Happy coding!
Read More...

Sunday 15 March 2015

How to create a Window Service for MongoDB

Leave a Comment
From Sitecore 7.5 onwards MongoDB will be used as the new collection database for the Sitecore Experience Database (xDB). In the xDB, the collection database acts as a primary storage or central repository for storing contact, device, interaction, history and analytics information. In this blog post I am going to explain how to install MongoDB on Windows and how to create a Window Service for MongoDB that starts MongoDB automatically at boot time.
  1. Download the latest stable production release installer file (.msi) of MongoDB from the MongoDB download section. Ensure you download the correct version of MongoDB (32 Bit or 64 Bit) for your Windows system.
  2. Double click on downloaded .msi installer file. You can specify a different installation directory if you choose the “Custom” installation option. I’ve installed MongoDB 3.0.0 version to C:\mongodb.
  3. You can set up the MongoDB server as a Windows Service that starts automatically at boot time. If you have installed MongoDB in different installation directory, you have to modify the paths as appropriate in next configuration steps.
  4. Open command prompt with administrator privileges. MongoDB requires a data directory to store all data. MongoDB’s default data directory path is \data\db.
  5. Create directories for your database and log files. Execute below commands in command prompt:
    mkdir c:\mongodb\data\db
    mkdir c:\mongodb\data\log
  6. Create a configuration (.cfg) file. This file includes configuration options for mongod but it must include a valid setting for logpath and dbpath. The following command creates a configuration file, specifying both the logpath and the dbpath settings in the configuration file with respect to your installation directory:
    echo logpath=c:\mongodb\data\log\mongod.log> "C:\mongodb\mongod.cfg"
    echo dbpath=c:\mongodb\data\db>> "C:\mongodb\mongod.cfg"
  7. Create the MongoDB service by executing below command.
    sc.exe create MongoDB binPath= "\"C:\mongodb\bin\mongod.exe\" --service --config=\"C:\mongodb\mongod.cfg\"" DisplayName= "MongoDB" start= "auto"
    sc.exe requires a space between “=” and the configuration values (eg “binPath= ”), and a “\” to escape double quotes. The  following log message will display once MongoDB Service is successfully created:
    [SC] CreateService SUCCESS
  8. Start the MongoDB service by typing below command:
    net start MongoDB
    you’ll get below log message once MongoDB service is successfully started.
    The MongoDB service was started successfully.
Comments and suggestions are most welcome. Happy coding!
Read More...