Sunday 1 November 2015

Custom Sitecore Rich Text Field Max Length Validator

Leave a Comment
Recently I have stumbled upon in a situation where I have to implement Max Length validation on Rich Text Field of a template so that content editor cannot enter more text. For this restriction, I’ve created a Custom Sitecore Rich Text Field Max Length Validator and configured the validator to rich text field. Main thing to be noted about requirement is that html markup should be excluded while length counting and only actual text length should be validated.  Below are the steps of creating a custom validator:
  1. Create an empty assembly project using Visual Studio.
  2. Add the following assembly references to your project:
    a) Sitecore.Kernel
    b) Sitecore.Client
    c) System.Web
  3. Create a new class CustomMaxLengthFieldValidator and write below code in class.
    using Sitecore;
    using Sitecore.Data.Validators;
    using System;
    using System.Collections.Generic;
    using System.Linq;
    using System.Runtime.Serialization;
    using System.Text;
    using System.Threading.Tasks;
    
    namespace SitecoreRichTextMaxLengthValidation
    {
           /// <summary>
        /// Represents a MaxLengthFieldValidator.
        /// </summary>
        [Serializable]
        public class CustomMaxLengthFieldValidator : StandardValidator
        {
            /// <summary>
            /// Gets the name.
            /// </summary>
            /// <value>The validator name.</value>
            public override string Name
            {
                get
                {
                    return "Max Length";
                }
            }
    
            /// <summary>
            /// Initializes a new instance of the <see cref="T:SitecoreRichTextMaxLengthValidation.CustomMaxLengthFieldValidator" /> class. 
            /// </summary>
            public CustomMaxLengthFieldValidator()
            {
            }
    
            /// <summary>
            /// Initializes a new instance of the <see cref="T:SitecoreRichTextMaxLengthValidation.CustomMaxLengthFieldValidator" /> class. 
            /// </summary>
            /// <param name="info">
            /// The serialization info.
            /// </param>
            /// <param name="context">
            /// The context.
            /// </param>
            public CustomMaxLengthFieldValidator(SerializationInfo info, StreamingContext context)
                : base(info, context)
            {
            }
    
            /// <summary>
            /// When overridden in a derived class, this method contains the code to determine whether the value in the input control is valid.
            /// </summary>
            /// <returns>
            /// The result of the evaluation.
            /// </returns>
            protected override ValidatorResult Evaluate()
            {
                int num = MainUtil.GetInt(base.Parameters["maxlength"], 0);
                if (num <= 0)
                {
                    return ValidatorResult.Valid;
                }
                string controlValidationValue = GetControlValidationValue();
                if (string.IsNullOrEmpty(controlValidationValue))
                {
                    return ValidatorResult.Valid;
                }
                if (controlValidationValue.Length <= num)
                {
                    return ValidatorResult.Valid;
                }
                string[] fieldDisplayName = new string[] { base.GetFieldDisplayName(), num.ToString() };
                base.Text = base.GetText("The maximum length of the field \"{0}\" is {1} characters.", fieldDisplayName);
                return base.GetFailedResult(ValidatorResult.FatalError);
            }
    
            /// <summary>
            /// Gets the max validator result.
            /// </summary>
            /// <remarks>
            /// This is used when saving and the validator uses a thread. If the Max Validator Result
            /// is Error or below, the validator does not have to be evaluated before saving.
            /// If the Max Validator Result is CriticalError or FatalError, the validator must have
            /// been evaluated before saving.
            /// </remarks>
            /// <returns>
            /// The max validator result.
            /// </returns>
            protected override ValidatorResult GetMaxValidatorResult()
            {
                return base.GetFailedResult(ValidatorResult.FatalError);
            }
    
            protected override string GetControlValidationValue()
            {
                return Sitecore.StringUtil.RemoveTags(base.GetControlValidationValue());
            }
        }
    }
    
  4. Compile your assembly and put it in the /bin folder of your website.
  5. Create a new folder User Defined at location /sitecore/system/Settings/Validation Rules/Field Rules/ in master database.
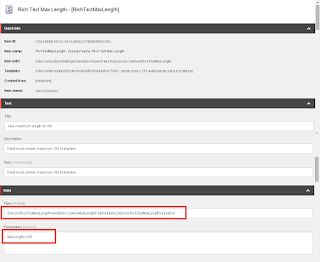
  6. Create a new validation rule RichTextMaxLength by using template /sitecore/templates/System/Validation/Validation Rule at location /sitecore/system/Settings/Validation Rules/Field Rules/User Defined/
  7. Change the default value of the "Type" field to SitecoreRichTextMaxLengthValidation.CustomMaxLengthFieldValidator,SitecoreRichTextMaxLengthValidation. The type format is "<namespace>.<class name>, <assembly name>".
  8. In "Parameters" field enter MaxLength=100. MaxLength value is configurable and change it as per your requirement.

  9.    To configure validation rules for a specific data template field:
    a) In the Template Manager or the Content Editor, select the data template field definition item.
    b) In the Template Manager or the Content Editor, in the Validation Rules section, configure field validation rules.
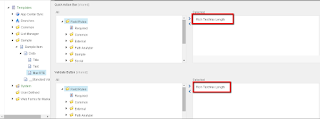
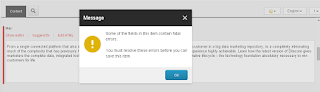
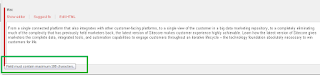
  10. Now create a sample item and verify if everything works well. You will see below error while saving item if field is having more than 100 characters.

Source code is available at github. Comments and suggestions are most welcome. Happy coding! 
Read More...

Saturday 3 October 2015

Customize Sitecore Device Editor Dialog

Leave a Comment
In this blog post I am going to explain how to enhance Sitecore Device Editor Dialog and give enhanced experience to Content editors. Let’s take a simple scenario where you have added same rendering or sublayout multiple times on page item. Refer to below screenshot of Launch Sitecore MVC website where Abstract Spot rendering is added multiple times.


Content editors may find themselves in a situation where they wish to edit a particular section of page and they might get confused by seeing same rendering multiple times. They have to go through each rendering and check the data source and placeholder to identify which rendering is added to display that particular section of page and situation becomes worse and more confusing if same rendering is added multiple times.

To solve this challenge, I’ve modified Device Editor Dialog and added one field (Rendering Description) which stores helper text related to particular rendering. Check Abstract Spot rendering in below screenshot which is added multiple times.


Enter rendering description is optional and you won’t face any error if content editors are not entering any values in it.

Installation:
  1. Download Sitecore Package from here for Sitecore 8 version.
  2. Install downloaded Sitecore package and restart Sitecore client.  
Uninstallation:
  1. Delete Item {6526A54E-B8C0-432D-9C9C-0998178BFB88} or /sitecore/templates/System/Layout/Rendering Parameters/Standard Rendering Parameters/General/Description
  2. Delete AdvancedDeviceEditor.dll from bin folder
  3. Delete DeviceEditor.xml and DeviceRendering.xml from \Website\sitecore\shell\Override\Applications\Layouts\DeviceEditor 
Source code is available on github. Comments and suggestions are most welcome. Happy coding!
Read More...

Sunday 6 September 2015

WFFM error : XmlControl was null

Leave a Comment
Recently I’ve been involved in Sitecore upgradation from 6.5 to 8.0 and upgraded WFFM module as well. After upgradation, I’ve noticed that I was getting a pop up window with below error whenever I am clicking on any form in content editor.

An instance of Sitecore.Web.UI.XmlControls.XmlControl was null.
Description: An unhandled exception occurred during the execution of the current web request. Please review the stack trace for more information about the error and where it originated in the code. 

Exception Details: System.InvalidOperationException: An instance of Sitecore.Web.UI.XmlControls.XmlControl was null.

Source Error: 
An unhandled exception was generated during the execution of the current web request. Information regarding the origin and location of the exception can be identified using the exception stack trace below.

Stack Trace: 

[InvalidOperationException: An instance of Sitecore.Web.UI.XmlControls.XmlControl was null.]
   Sitecore.Diagnostics.Assert.IsNotNull(Object value, String message) +55
   Sitecore.Form.UI.Controls.GroupListBuilder.BuildGroup(GridPanel grid, GroupDefinition group) +131
   Sitecore.Form.UI.Controls.GroupListBuilder.BuildGroups(GridPanel grid, ListDefinition list) +175
   Sitecore.Form.UI.Controls.GroupListBuilder.BuildGrid(Control parent) +706
   System.Web.UI.Control.LoadRecursive() +71
   System.Web.UI.Control.LoadRecursive() +190
   System.Web.UI.Control.LoadRecursive() +190
   System.Web.UI.Control.LoadRecursive() +190
   System.Web.UI.Control.LoadRecursive() +190
   System.Web.UI.Control.LoadRecursive() +190
   System.Web.UI.Control.LoadRecursive() +190
   System.Web.UI.Control.LoadRecursive() +190
   System.Web.UI.Control.LoadRecursive() +190
   System.Web.UI.Control.LoadRecursive() +190
   System.Web.UI.Page.ProcessRequestMain(Boolean includeStagesBeforeAsyncPoint, Boolean includeStagesAfterAsyncPoint) +3178
I’ve started debugging issue and downloaded relevant complete WFFM package from dev.sitecore.net. I’ve compared files in wwwroot with WFFM package files and noticed that few files and folders were missing at \Website\sitecore\shell\Applications\Modules\Web Forms for Marketers\Controls location. I’ve copied files from WFFM package to wwwroot to resolve the issue. It seems that during Sitecore upgradation few files were missed out. Comments and suggestions are most welcome. Happy coding!
Read More...

Sunday 23 August 2015

Change sort order of languages in the language menu

Leave a Comment
Lately I have been playing more with language menu in Sitecore 8 content editor. Check this post how to enable flag icon in language drop down menu in Sitecore. If you have Sitecore site with many languages then probably you will find one thing most annoying – order of languages in language menu. By default, Sitecore displays the languages in the language selector ordered by the created date but I want to sort languages based on language name in languages menu. Below steps illustrates how to change sort order in which the languages are displayed in the languages menu:
  1. Create a new class and inherit Sitecore.Data.SqlServer.SqlServerDataProvider class.
  2. Override function GetLanguages() and sort languages  using the IComparer interface using a helper class by providing your own implementation for sort logic.
    using Sitecore.Collections;
    using Sitecore.Globalization;
    using System;
    using System.Collections.Generic;
    
    namespace SitecoreCustomizedLanguageOrder
    {
        public class LanguageSortOrder : Sitecore.Data.SqlServer.SqlServerDataProvider
        {
            public LanguageSortOrder(string connectionString) : base(connectionString) { }
    
            private class LanguageComparer : IComparer<Language>
            {
                #region IComparer<Language> Members
                LanguageSortOrder provider;
                public LanguageComparer(LanguageSortOrder dataProvider)
                {
                    this.provider = dataProvider;
    
                }
                public int Compare(Language x, Language y)
                {
                    return string.Compare(x.CultureInfo.EnglishName, y.CultureInfo.EnglishName);
                }
    
                #endregion
            }
            
            public override LanguageCollection GetLanguages()
            {           
                Language[] languages = base.GetLanguages().ToArray();           
                Array.Sort(languages, new LanguageComparer(this));
                LanguageCollection result = new LanguageCollection();
                foreach (Language language in languages)
                {
                    result.Add(language);
                }
                return result;
            }
        }
    }
    
  3. Compile source code and placed dll in bin folder. 
  4. Create new Sitecore Config patch file (CustomDataProvider.config) and provide following data provider definition:
    Old data provider definition
    <main type="Sitecore.Data.$(database).$(database)DataProvider, Sitecore.Kernel">
            <param connectionStringName="$(1)"/>
            <Name>$(1)</Name>
          </main>    
    New data provider definition
    <configuration xmlns:patch="http://www.sitecore.net/xmlconfig/">
      <sitecore>
        <dataProviders>      
          <main type="SitecoreCustomizedLanguageOrder.LanguageSortOrder,SitecoreCustomizedLanguageOrder" patch:instead="main">
            <param connectionStringName="$(1)"/>
            <Name>$(1)</Name>
          </main>
        </dataProviders>
      </sitecore>
    </configuration>
  5. Deploy CustomDataProvider.config file in \Website\App_Config\Include folder.
  6. Create a custom event handler which will clear the cache when the language sort order is changed. Here’s the code to achieve this:
    using Sitecore;
    using Sitecore.Caching;
    using Sitecore.Data.Items;
    using Sitecore.Events;
    using System;
    
    namespace SitecoreCustomizedLanguageOrder
    {
        public class NotifyLanguageSortOrderChanged
        {
            public void OnItemSortorderChanged(object sender, EventArgs e)
            {
                Item item = Event.ExtractParameter(e, 0) as Item;
                if (item.TemplateID == TemplateIDs.Language)
                {
                    foreach (Cache cache in CacheManager.GetAllCaches())
                    {
                        if (cache.Name == "LanguageProvider - Languages")
                        {
                            cache.Clear();
                        }
                    }
                }
            }
        }
    }
    
    
  7. Create new Sitecore Config patch file (LanguageSortOrderChanged.config ) and add the new event handler.
    <configuration xmlns:patch="http://www.sitecore.net/xmlconfig/">
      <sitecore>
        <events>
          <event name="item:sortorderchanged" >
            <handler type="SitecoreCustomizedLanguageOrder.NotifyLanguageSortOrderChanged,SitecoreCustomizedLanguageOrder" method="OnItemSortorderChanged" />
          </event>
        </events>
      </sitecore>
    </configuration>
    
  8. Deploy LanguageSortOrderChanged.config file in \Website\App_Config\Include folder.


Source code can be downloaded from github. Comments and suggestions are most welcome. Happy coding!
Read More...

Sunday 9 August 2015

Display flag icon in language dropdown in Sitecore 8

Leave a Comment
Sitecore UI and UX have been changed drastically with version 8 and Sitecore 8 provides a slick and powerful experience.  One thing you’ve surely noticed that you can’t see flag icon in language drop down in Sitecore 8 Content Editor.
The absence of the flags in Sitecore 8 is by-design. The list of all the flags in the world is changed quite frequently. That's why Sitecore decided that it's better not to show any flags, than having incorrect or not full list of flags. In my opinion, flag icons provides better UI experience and helps content editors to select item in a specific language easily. Visual content influences an individual’s brain in a faster and more comprehensible way than textual content.  I’ve configured flag icon manually for a specific language by going to configure tab and selecting appropriate icon but still I am not able to see flag icon in language drop down.
I’ve checked source code of Gallery Languages.xml file ( Website\sitecore\shell\Applications\Content Manager\Galleries\Languages) and able to see that display is set to none for Languages div.
div#Languages img {
        display: none;
        }
I’ve commented out display:none line but no success. Check below image to see how language drop down looks after commenting out line:
 I’ve overridden the OnLoad method of the GalleryLanguagesForm class and added the following code:
using Sitecore;
using Sitecore.Configuration;
using Sitecore.Data;
using Sitecore.Data.Items;
using Sitecore.Data.Managers;
using Sitecore.Diagnostics;
using Sitecore.Globalization;
using Sitecore.Security.AccessControl;
using Sitecore.Shell;
using Sitecore.Shell.Applications.ContentManager.Galleries;
using Sitecore.Shell.Applications.ContentManager.Galleries.Languages;
using Sitecore.Web;
using Sitecore.Web.UI.HtmlControls;
using Sitecore.Web.UI.Sheer;
using Sitecore.Web.UI.XmlControls;
using System;
using System.Globalization;

namespace SitecoreFlagIcon
{
    public class GalleryLanguagesForm : GalleryForm
    {
        /// <summary></summary>
        protected Scrollbox Languages;

        /// <summary></summary>
        protected GalleryMenu Options;
      
        /// <summary>
        /// Raises the load event.
        /// 
        /// </summary>
        /// <param name="e">The <see cref="T:System.EventArgs"/> instance containing the event data.</param>
        /// <remarks>
        /// This method notifies the server control that it should perform actions common to each HTTP
        ///             request for the page it is associated with, such as setting up a database query. At this
        ///             stage in the page lifecycle, server controls in the hierarchy are created and initialized,
        ///             view state is restored, and form controls reflect client-side data. Use the IsPostBack
        ///             property to determine whether the page is being loaded in response to a client postback,
        ///             or if it is being loaded and accessed for the first time.
        /// 
        /// </remarks>
        protected override void OnLoad(EventArgs e)
        {
            Assert.ArgumentNotNull((object)e, "e");
            base.OnLoad(e);
            if (Context.ClientPage.IsEvent)
                return;
            Item currentItem = GalleryLanguagesForm.GetCurrentItem();
            if (currentItem == null)
                return;
            using (new ThreadCultureSwitcher(Context.Language.CultureInfo))
            {
                foreach (Language language in currentItem.Languages)
                {
                    string languageIcon = string.Empty;
                    ID languageItemId = LanguageManager.GetLanguageItemId(language, currentItem.Database);
                    if (!ItemUtil.IsNull(languageItemId))
                    {
                        Item obj = currentItem.Database.GetItem(languageItemId);
                        if (obj != null)
                        {
                            languageIcon = obj["__icon"];
                        }
                        if (obj == null || !obj.Access.CanRead() || obj.Appearance.Hidden && !UserOptions.View.ShowHiddenItems)
                            continue;
                    }
                    XmlControl xmlControl = ControlFactory.GetControl("Gallery.Languages.Option") as XmlControl;
                    Assert.IsNotNull((object)xmlControl, typeof(XmlControl));
                    Context.ClientPage.AddControl((System.Web.UI.Control)this.Languages, (System.Web.UI.Control)xmlControl);
                    Item obj1 = currentItem.Database.GetItem(currentItem.ID, language);
                    if (obj1 != null)
                    {
                        int length = obj1.Versions.GetVersionNumbers(false).Length;
                        string str1;
                        if (length != 1)
                            str1 = Translate.Text("{0} versions.", (object)length.ToString());
                        else
                            str1 = Translate.Text("1 version.");
                        string str2 = str1;
                        CultureInfo cultureInfo = language.CultureInfo;
                        xmlControl["Header"] = (object)(cultureInfo.DisplayName + " : " + cultureInfo.NativeName);
                        xmlControl["Description"] = (object)str2;
                        xmlControl["Click"] = (object)string.Format("item:load(id={0},language={1},version=0)", (object)currentItem.ID, (object)language);
                        xmlControl["ClassName"] = !language.Name.Equals(WebUtil.GetQueryString("la"), StringComparison.OrdinalIgnoreCase) ? (object)"scMenuPanelItem" : (object)"scMenuPanelItemSelected";
                        var lang = LanguageDefinitions.GetLanguageDefinition(language);
                        if(lang!=null)
                            languageIcon = lang.Icon;
                        
                     xmlControl["Icon"] = languageIcon; 
                    }
                }
            }
            Item obj2 = Sitecore.Client.CoreDatabase.GetItem("/sitecore/content/Applications/Content Editor/Menues/Languages");
            if (obj2 == null)
                return;
            this.Options.AddFromDataSource(obj2, string.Empty);
        }

        /// <summary>
        /// Gets the current item.
        /// 
        /// </summary>
        /// 
        /// <returns>
        /// The current item.
        /// </returns>
        private static Item GetCurrentItem()
        {
            string queryString1 = WebUtil.GetQueryString("db");
            string queryString2 = WebUtil.GetQueryString("id");
            Language language = Language.Parse(WebUtil.GetQueryString("la"));
            Sitecore.Data.Version version = Sitecore.Data.Version.Parse(WebUtil.GetQueryString("vs"));
            Database database = Factory.GetDatabase(queryString1);
            Assert.IsNotNull((object)database, queryString1);
            return database.GetItem(queryString2, language, version);
        }

        /// <summary>
        /// Handles the message.
        /// </summary>
        /// <param name="message">The message.</param>
        public override void HandleMessage(Message message)
        {
            Assert.ArgumentNotNull(message, "message");
            if (message.Name == "event:click")
            {
                return;
            }
            base.Invoke(message, true);
        }
    }
}
Compile the solution and put dll in bin folder of website root. I’ve also duplicated Gallery Languages.xml file and copied it at Website\sitecore\shell\Override\Applications\Content Manager\Galleries\Languages location and also updated Gallery Languages code-beside class to use our code-beside class instead of Sitecore's default class and that’s it! I am able to see flag icon for languages in Sitecore Content tree.
Below is the source code of Gallery Languages.xml.
<?xml version="1.0" encoding="utf-8" ?> 
<control xmlns:def="Definition" xmlns="http://schemas.sitecore.net/Visual-Studio-Intellisense" xmlns:shell="http://www.sitecore.net/shell">
  <Gallery.Languages>
    <Gallery>
    <CodeBeside Type="SitecoreFlagIcon.GalleryLanguagesForm,GalleryLanguagesForm"/>

    <!--  <CodeBeside Type="Sitecore.Shell.Applications.ContentManager.Galleries.Languages.GalleryLanguagesForm,Sitecore.Client"/> -->
      <Script>
        window.onload = function() {
          var activeLanguage = document.querySelector('.scMenuPanelItemSelected');
          activeLanguage.scrollIntoView(false);
        }
      </Script>
      

      <Stylesheet Key="GalleryLanguages">
        .scMenuPanelItem, .scMenuPanelItem_Hover, .scMenuPanelItemSelected_Hover, .scMenuPanelItemSelected {
        padding-left: 0;
        padding-right: 0;
        padding-top: 8px;
        padding-bottom: 8px;
        }
        .scGalleryGrip {
        position: absolute;
        bottom: 1px;
        left: 1px;
        right: 1px;
        height: 10px;
        }
        .scLanguagesGalleryMenu {
        overflow: hidden;
        vertical-align: top;
        border-bottom: 12px solid transparent;
        -moz-box-sizing: border-box;
        box-sizing: border-box;
        width: 100%;
        height: 100%;
        border-collapse: separate;
        }
        div#Languages img {
        //display: none;
        }
      </Stylesheet>

      <Border Width="100%" Height="100%">

        <GalleryMenu ID="Options" Class="scLanguagesGalleryMenu">

          <MenuPanel Height="100%">
            <Scrollbox ID="Languages" Class="scScrollbox scFixSize scFixWidthInsideGallery" style="padding-top:0 !important;" Height="100%" Width="100%" />
          </MenuPanel>

        </GalleryMenu>

        <Gallery.Grip />

      </Border>

    </Gallery>
  </Gallery.Languages>
</control>

Source code can be downloaded from github.  Comments and suggestions are most welcome. Happy coding!
Read More...

Saturday 18 July 2015

Add selected item in multilist at top position

Leave a Comment
In this blog post I am going to explain how to add selected item at top position of the multilist instead of bottom in Sitecore content editor. By default, whenever an item is selected and moved to right side section in the multilist editor then the selected item is added to the bottom of the list in right section. I want to change this behavior so that selected item is added at top position of the list in right section.

To implement this feature we have to modify the 'multilistMoveRight' javascript function in Content Editor.js file. This file exists at \Website\sitecore\shell\Applications\Content Manager folder of website root. Open Content Editor.js file and search for scContentEditor.prototype.multilistMoveRight and modify existing code as below:
scContentEditor.prototype.multilistMoveRight = function (id, allOptions) {
    var all = scForm.browser.getControl(id + "_unselected");
    var selected = scForm.browser.getControl(id + "_selected");

    for (var n = 0; n < all.options.length; n++) {
        var option = all.options[n];

        if (option.selected || allOptions == true) {
            var opt = document.createElement("OPTION");

            selected.appendChild(opt);

            opt.innerHTML = option.innerHTML;
            opt.value = option.value;
        }
    }

    this.multilistRemoveSelected(all, allOptions, id + "_all_help");

    this.multilistUpdate(id);

    //move the last item to the top
    for (var n = selected.options.length - 1; n > 0; n--) {
        var option = selected.options[n];       
        var prev = scForm.browser.getPreviousSibling(option);
        scForm.browser.swapNode(option, prev);
    }
}

Comments and suggestions are most welcome. Happy coding!
Read More...

Sunday 12 July 2015

Bundling and minification in Sitecore MVC

1 comment
This is a quick blog post on how to implement bundling and minification in Sitecore MVC project.  During development phase, it is always good to have multiple Javascripts and CSS files for better readability and maintainability of code.  But multiple Javascripts and CSS files degrade the performance of production website and also increase the load time of webpages as it requires multiple HTTP requests from browser to server.  Bundling and minification reduce the size of Javascript and CSS files and bundle multiple files into a single file and make the site perform faster by making fewer HTTP requests. Below steps explain how to implement bundling and minification for Sitecore MVC project:
  1. Add Microsoft ASP.NET Web Optimization Framework to your solution from nuget or run the following command in the Package Manager Console to install Microsoft ASP.NET Web Optimization Framework.
    PM> Install-Package Microsoft.AspNet.Web.Optimization
  2. Create your CSS and Javascript bundles in “BundleConfig” class under App_Start folder and add reference of "System.Web.Optimization" namespace.
    public class BundleConfig
        {
            public static void RegisterBundles(BundleCollection bundles)
            {
                //js bundling using wildcard character *
                bundles.Add(new ScriptBundle("~/bundles/js").Include("~/assets/js/*.js"));
    
                //css bundling using wildcard character *
                bundles.Add(new StyleBundle("~/bundles/css").Include("~/assets/css/*.css"));
            }
        }
  3. Register bundle in the Application_Start method in the Global.asax file. If you are using Multi-site instance of Sitecore MVC then recommend way to implement bundling logic is by creating a new processor into the initialize pipeline. This blog explains how to do configure it using pipeline processor.
     protected void Application_Start(object sender, EventArgs e)
            {
                BundleConfig.RegisterBundles(BundleTable.Bundles);
            }
  4. Enable bundling and minification by setting the value of the debug attribute in the compilation element to false in web.config.
    <compilation defaultLanguage="c#" debug="false" targetFramework="4.5">
    </compilation>
    
    We can override the value of the debug attribute in code by using EnableOptimizations property of the BundleTable class.
    protected void Application_BeginRequest(object sender, EventArgs e)
            {
                EnableBundleOptimizations();
            }
    
            private void EnableBundleOptimizations()
            {
                string debugMode = Request.QueryString["debug"];
                if (!string.IsNullOrEmpty(debugMode) && string.Equals(debugMode, "true", StringComparison.InvariantCultureIgnoreCase))
                {
                    BundleTable.EnableOptimizations = false;
                }
                else
                {
                    BundleTable.EnableOptimizations = true;
                }
            }
    Here in Application_BeginRequest method of Global.asax I am calling one custom method EnableBundleOptimizations() which sets the value of EnableOptimizations property to true or false based on value of querystring “debug”. Main idea behind this logic is that we can check/debug CSS or Javascript file on production by passing querystring parameter debug as true. 
  5. Replace Javascripts and CSS references in layout or rendering view with below code:
    @Styles.Render("~/bundles/css")
    @Scripts.Render("~/bundles/js")
    
  6. In web.config set an ignore url prefix for your bundle so that Sitecore won’t try to resolve the URL to the bundle. Update setting IgnoreUrlPrefixes according to your bundle name:
    <setting name="IgnoreUrlPrefixes" value="/sitecore/default.aspx|/trace.axd|/webresource.axd|/sitecore/shell/Controls/Rich Text Editor/Telerik.Web.UI.DialogHandler.aspx|/sitecore/shell/applications/content manager/telerik.web.ui.dialoghandler.aspx|/sitecore/shell/Controls/Rich Text Editor/Telerik.Web.UI.SpellCheckHandler.axd|/Telerik.Web.UI.WebResource.axd|/sitecore/admin/upgrade/|/layouts/testing|/bundles/js|/bundles/css"/>
  7. Now compile your solution and verify that bundling and minification is enabled by checking view source of webpage.
    Pass querystring as debug=true in url and now verify view source of webpage. Bundling and minification is not enabled. This enables us to debug Javascript and CSS files in production website.
Comments and suggestions are most welcome. Happy coding!
Read More...

Monday 29 June 2015

How to hide Quick Info section using code in Sitecore

1 comment
In this blog I am going to explain how to hide the Quick Info section in the content editor using code. We can show/hide Quick Info section manually by using below steps:
  1. Click on top-left burger menu and then click on Application Options from the menu. The Application Options dialog popup will appear.

  2. Check/uncheck Quick Info section checkbox in content editor tab and click on OK.

Whenever a user gets successfully login then Sitecore executes the loggedin pipeline. Below custom processor is added to loggedin pipeline which sets a flag in the user profile to hide Quick Info section:
using Sitecore.Pipelines.LoggedIn;
using Sitecore.Shell;

namespace Sitecore.Ramblings
{
    public class QuickInfo:Sitecore.Pipelines.LoggedIn.LoggedInProcessor
    {
        /// <summary>The process.</summary>
        /// <param name="args">The args.</param>
        public override void Process(LoggedInArgs args)
        {
            const string DefaultQuickInfo = "false";

            Sitecore.Diagnostics.Assert.ArgumentNotNull(args, "args");
            Sitecore.Diagnostics.Assert.IsTrue(
              Sitecore.Security.Accounts.User.Exists(args.Username),
              args.Username);

            var user = Sitecore.Security.Accounts.User.FromName(
              args.Username,
              true);

            Sitecore.Diagnostics.Assert.IsNotNull(user, "user");

            var sitecoreDomain = Sitecore.SecurityModel.DomainManager.GetDomain(
              "sitecore");

            Sitecore.Diagnostics.Assert.IsNotNull(sitecoreDomain, "sitecoreDomain");

            if (user.Domain != sitecoreDomain
              || user.Name.ToLower().EndsWith("\\" + sitecoreDomain.AnonymousUserName))
            {
                Sitecore.Diagnostics.Log.Warn(this + " : unexpected security domain or user : " + user.Name, this);
                return;
            }

            var key = "/" + args.Username + "/UserOptions.ContentEditor.ShowQuickInfo";

            if (!string.IsNullOrEmpty(user.Profile[key]))
            {
                user.Profile[key] = DefaultQuickInfo;
                user.Profile.Save();
            }

            //bool showQuickInfo = UserOptions.ContentEditor.ShowQuickInfo;
        }
    }
}
Then patch below configuration change to add custom processor in loggedin pipeline and save the configuration file in App_Config\Include folder:
<configuration xmlns:patch="http://www.sitecore.net/xmlconfig/">
  <sitecore>
    <processors>
      <loggedin>
        <processor patch:after="processor[position()=last()]" type="Sitecore.Ramblings.QuickInfo, Sitecore.Ramblings" />
      </loggedin>
    </processors>
  </sitecore>
</configuration>
Now login in Sitecore content editor and Quick Info section will be hidden.

References:
  1. Sitecore Blog by John West
Comments and suggestions are most welcome. Happy coding!
Read More...

Tuesday 23 June 2015

Sitecore 8 : General Link Field : Target attribute bug

Leave a Comment
Recently I have faced one issue with Sitecore 8 update 3. If you are using General Link field type and choose insert internal link then the target attribute will not be correctly set. Insert link popup window gives three options in target window dropdown list:


If you select Active Browser then your target attribute will be rendered as “Active Browser
<a href="/BlogPage" target="Active Browser">Blog Title</a>
If you select New Browser then your target attribute will be rendered as “New Browser
<a href="/BlogPage" target="New Browser">Blog Title</a>
It means that target attribute is not rendering properly. Correct way of rendering is:
Active Browser:
<a href="/BlogPage">Blog Title</a>
New Browser:
<a href="/BlogPage" target="_blank">Blog Title</a>
The easiest solution to fix this bug is update Root field value of item {ABF3B317-CFCA-441A-815A-F810AB1EDB0D} or /sitecore/client/Applications/Dialogs/InsertLinkViaTreeDialog/PageSettings/TargetsSearchPanelConfig in Core database.  Update the existing value sitecore/client/Applications/Dialogs/InsertLinkViaTreeDialog/PageSettings/Targets to sitecore/client/Business Component Library/System/Texts/Targets


Now insert link popup window gives four options in target window dropdown list:

  1. SelectTarget : Opens the linked document in the same frame as it was clicked (this is default).
    <a href="/BlogPage">Blog Title</a>
    
  2. _blank : Opens the linked document in a new window or tab.
    <a href="/BlogPage" target="_blank">Blog Title</a>
    
  3. _parent : Opens the linked document in the parent frame.
    <a href="/BlogPage" target="_parent">Blog Title</a>
    
  4. _top : Opens the linked document in the full body of the window.
    <a href="/BlogPage" target="_top">Blog Title</a>
    
Comments and suggestions are most welcome. Happy coding!
Read More...

Monday 22 June 2015

How to display/hide a Sublayout based on language

Leave a Comment
Recently I’d stumbled upon a post on Sitecore Community regarding how to display/hide a Sublayout based on a language version.

Original question: We have one presentation control (Sublayout) added in one Page. But we need to restrict for some specific language versions. How to do this?

We can achieve this functionality using Personalization. Select the Sublayout which you want to display/hide and personalize the Sublayout by creating new personalization condition.  See below screenshots to understand how to personalize the component.


This is how page is looking when hide component checkbox is unchecked.


This is how page is looking when hide component checkbox is checked.

If you're using Sitecore 8, then you can achieve same functionality by using versioned layouts too. You can configure presentation details of each language independently. Check this documentation which shows how to work with versioned layouts. Comments and suggestions are most welcome. Happy coding!
Read More...

Sunday 14 June 2015

Querying Lucene index with Sitecore ContentSearch API on Date field

Leave a Comment
Last month I’ve been involved in implementing Sitecore Content Search API for a project and stuck up in a situation where I have to index some Sitecore items and to perform some operations on Sitecore Date field type. Data template is having below fields:
BlogDate field is created with the type ‘Date’. I’ve to get all the blog items within a specific year.  Sitecore Content Search API enables us to write search queries using LINQ statements. I’ve written below code to get all items which are created using Blog template and belong to specific year:

POCO Class
public class BlogItem : SearchResultItem
{

    [IndexField("BlogTitle")]
    public string BlogTitle { get; set; }

    [IndexField("BlogDate")]
    public DateTime BlogDate { get; set; }

    [IndexField("BlogContent")]
    public string BlogContent { get; set; }
}
Lucene Index Configuration
<field fieldName="BlogTitle"                storageType="YES"  indexType="TOKENIZED"    vectorType="NO" boost="1f" type="System.String" settingType="Sitecore.ContentSearch.LuceneProvider.LuceneSearchFieldConfiguration, Sitecore.ContentSearch.LuceneProvider" />

<field fieldName="BlogDate"                storageType="YES"  indexType="TOKENIZED"    vectorType="NO" boost="1f" type="System.DateTime" settingType="Sitecore.ContentSearch.LuceneProvider.LuceneSearchFieldConfiguration, Sitecore.ContentSearch.LuceneProvider" />

<field fieldName="BlogContent"                storageType="YES"  indexType="TOKENIZED"    vectorType="NO" boost="1f" type="System.String" settingType="Sitecore.ContentSearch.LuceneProvider.LuceneSearchFieldConfiguration, Sitecore.ContentSearch.LuceneProvider" />
C# Code
public void GetItemsByYear(int year)
        {
            ID blogTemplateId = new Sitecore.Data.ID("{48587868-4A19-48BB-8FC9-F1DD31CB6C8E}");
            var index = Sitecore.ContentSearch.ContentSearchManager.GetIndex("custom_index");
            List<BlogItem> allBlogItems = new List<BlogItem>();
            using (Sitecore.ContentSearch.IProviderSearchContext context = index.CreateSearchContext())
            {
                allBlogItems = context.GetQueryable<BlogItem>()
                                   .Where(s => s.TemplateId == blogTemplateId && s.BlogDate.Year == year).ToList();
            }            
        }
Unfortunately above code doesn’t return all items which are created using Blog template and belong to specific year and I can’t debug Lamba expression to know what is the exact value of BlogDate.Year. So I’ve started troubleshooting this issue. Sitecore stores date field value as ISO 8601 date time string format (yyyyMMddThhmmss). It can be verified in raw value:
I’ve also checked format of date field in Lucene index by Luke. Are you new to Luke? No problems. I would strongly suggest you to read this article by Dan to understand how to debug Lucene based ContentSearch in Sitecore. Below is the format of date field in Lucene index:
So basically value of data field is getting indexed in yyyyMMddThhmmss format. I’ve modified Lucene index configuration file as below for BlogDate field and added format=”yyyyMMdd”:
<field fieldName="BlogDate"                storageType="YES"  indexType="TOKENIZED"    vectorType="NO" boost="1f" type="System.DateTime" format="yyyyMMdd" settingType="Sitecore.ContentSearch.LuceneProvider.LuceneSearchFieldConfiguration, Sitecore.ContentSearch.LuceneProvider" />
I re-indexed Lucene index and now Date field is stored in yyyyMMdd format:
One important thing to note here is that Lucene indexes date field in a whole number format i.e.  Year, month and day value are stored in same field. It means that I can’t compare date field value with only year or only month or only day. So if you want to query against a date field in Sitecore LINQ query then you must compare it with DateTime type. Therefore I’ve modified my code logic as below to filter out blog items based on a particular year:
public void GetItemsByYear(int year)
        {
            DateTime startDate = new DateTime(year, 1, 1);
            DateTime endDate = new DateTime(year + 1, 1, 1);
            ID blogTemplateId = new Sitecore.Data.ID("{48587868-4A19-48BB-8FC9-F1DD31CB6C8E}");
            var index = Sitecore.ContentSearch.ContentSearchManager.GetIndex("custom_index");
            List<BlogItem> allItems = new List<BlogItem>();
            using (Sitecore.ContentSearch.IProviderSearchContext context = index.CreateSearchContext())
            {
                allItems = context.GetQueryable<BlogItem>()
                                   .Where(s => s.TemplateId == blogTemplateId && s.BlogDate >= startDate && s.BlogDate < endDate).ToList();
            }            
        } 
This logic solved the problem and I am getting blog items for a specific year.  Comments and suggestions are most welcome. Happy coding! 
Read More...

Thursday 7 May 2015

Useful Sitecore Links

Leave a Comment
In this blog post I am quickly listing down some useful Sitecore links which I refer frequently:
  1. Sitecore Official Website  
  2. Sitecore Community Network: Discuss tips, tricks, techniques, and solutions for every-day scenarios when working with the Sitecore Experience Platform.
  3. Sitecore Developer Network : Sitecore technical hub which is having technical documentation, tool downloads, code snippets, reference documents till Sitecore version 7.5.
  4. Sitecore Developer Forum : The developer forum is an active online developer community of Sitecore users, trained developers, certified partners and Sitecore staff members.
  5. Sitecore Experience Platform Documentation : You will find all new documentation for Sitecore Experience Platform on this website.
  6. Sitecore Knowledge Base Website : Sitecore Knowledge Base site provides access to multiple documented known issues, how-to articles, and security bulletins published by Sitecore.
  7. Sitecore Developer Portal : Starting with Sitecore Experience Platform 8 all Sitecore related technical information, release notes and product downloads will be available only on Sitecore developer portal.
  8. Sitecore Marketplace : Extend Sitecore with available open source modules or contribute your own modules to the community.
  9. Manage Sitecore Profile: Manage your Sitecore profile across all *.Sitecore.net sites.
  10. Sitecore Official Training : Sitecore Training website addresses the learning needs of all types of Sitecore users, from developers and administrators, to business users and marketers. 
  11. Sitecore Regional Office : Find contact information about your local/regional Sitecore office.
  12. Sitecore Community on GitHub : Sitecore Community on GitHub consists code samples and contrib projects.
  13. Sitecore Partner Network : Sitecore technical hub for Sitecore certified partners.
  14. Sitecore Resource Library : This resource library contains various learning resources like analyst reports, whitepapers, recorded webinars, videos, product vouchers and many more!
  15. Sitecore Business Blogs : Various Sitecore business blogs related to digital marketing, digital customer experience etc.
  16. Sitecore Technical Blogs : Sitecore technical blogs written by Sitecore technical community experts and Sitecore development team.
  17. Sitecore Best Practice Blogs : Expert advice from the Sitecore Best Practice Community. 
  18. Sitecore Blog Feed : Subscribe to feed of 130+ related blogs and 1000+ posts related to Sitecore to keep you informed.
  19. Sitecore Events and Webinars : Find Sitecore live events and register for upcoming webinars.
  20. Sitecore Community Driven Documentation :  Community-driven collection of developer resources - including blogs, videos, references, and articles.
  21. Sitecore Support Helpdesk : Access to Sitecore Support is offered through the Sitecore Support Portal.  
  22. Sitecore Support Repository : Sitecore support respository contains patches with source code, bug fixes and sample customizations.

Useful Sitecore Knowledge Base Articles

  1. Sitecore Product Support Lifecycle
  2. Sitecore Support - Scope of Services
  3. How to use Sitecore Support Portal 
  4. Sitecore Support Knowledge Base
  5. Known issues for Sitecore 8
  6. How to use Sitecore XP 8 without xDB
  7. Quarterly Security Bulletin
  8. Sitecore Compatibility Guide : This guide presents various Sitecore compatibility tables and similar useful articles. 
  9. Sitecore Compatibility Table : This table presents Sitecore CMS and Sitecore XP compatibility with different browsers, operating systems, .NET frameworks and database servers.
  10. ASP.NET MVC Compatibility Table : This table presents Sitecore Modules compatibility with different versions of ASP.NET MVC.
  11. Sitecore Modules Compatibility Table : This table presents the compatibility of Sitecore Modules with different Sitecore CMS versions.
  12. Sitecore Commerce Compatibility Table : This table presents the compatibility of different Sitecore CMS/XP versions with different Sitecore Commerce and Sitecore Commerce Connect versions.
  13. Sitecore Azure Compatibility Table : This table presents the compatibility of Sitecore Modules with different versions of Sitecore Azure.
  14. Microsoft Azure SDK Compatibility Table : This table presents Sitecore Azure module compatibility with different versions of Microsoft Azure SDK.
  15. Solr Compatibility Table : This table presents compatibility of different Sitecore CMS/XP versions with different Solr versions.
Comments and suggestions are most welcome. Happy coding!   
Read More...

Saturday 25 April 2015

How to use Sitecore XP without xDB

Leave a Comment
This is small blog post about how to configure and use Sitecore XP without xDB. If you have installed Sitecore 8 and you haven’t configured MongoDB then you might face various related to Sitecore.Analytics.MongoDB. You may face issues like package installer is going in infinite loop and item is not converting into Item Bucket. You can always check Sitecore log files for detailed error information. Below steps are required to use Sitecore 8 without xDB:
  • Disable Sitecore Analytics. Naviagte to /App_Config/Include/Sitecore.Analytics.config and set Analytics.Enabled to false:
    <setting name="Analytics.Enabled" value="false" />
  • Comment out analytics related connection strings. Navigate to /App_Config/ConnectionStrings.config and comment out the following connection strings:
  • <add name="analytics" connectionString="mongodb://localhost/analytics" />
    <add name="tracking.live" connectionString="mongodb://localhost/tracking_live" />
    <add name="tracking.history" connectionString="mongodb://localhost/tracking_history" />
    <add name="tracking.contact" connectionString="mongodb://localhost/tracking_contact" />
    <add name="reporting" connectionString="user id=user;password=password;Data Source=(server);Database=Sitecore_Analytics" />
    
Check Sitecore Knowledge Base article to know more about what features are functional or non-functional or partial functional when xDB is disabled. This article will be updated continuously by Sitecore team.

Comments and suggestions are most welcome. Happy coding!   
Read More...

Sunday 22 March 2015

Input Text Box Field for Data Source of rendering is missing

2 comments
Recently I’ve been involved into upgradation of existing Sitecore 6.6 solution to Sitecore 8 experience platform. After the upgradation; I’ve noticed one strange issue.  I was unable to change the data source of a rendering because the input text box field for data source of rendering was missing. See below screenshot:
Initially I thought that some changes had been made to the Data Source field in the Core database. The Data Source field is located in core database at location /sitecore/system/Field types/System Types/Datasource. I compared Data Source field of upgraded Core database to Core database of fresh Sitecore 8 installation and I didn’t find any difference in Data Source field after comparison. I’d also verified permission on the Data Source field of Core database and everything looks fine to me.

I kept on troubleshooting the issue and I compared configuration (/sitecore/admin/showconfig.aspx) of upgraded Sitecore solution to fresh Sitecore 8 solution. After comparison I have found that somehow Sitecore.Buckets.config file in App_Config\Include folder was missing.
<processor type="Sitecore.Buckets.FieldTypes.CustomDataSource, Sitecore.Buckets" patch:source="Sitecore.Buckets.config"/>
<source mode="on" namespace="Sitecore.Buckets.FieldTypes" assembly="Sitecore.Buckets" prefix="contentExtension" patch:source="Sitecore.Buckets.config"/>
I added Sitecore.Buckets.config in the App_Config/Include folder and input text box field for data source of rendering was enabled now.
Comments and suggestions are most welcome. Happy coding!   
Read More...

Friday 20 March 2015

Error: Load Denied by X-Frame-Options while opening Sitecore Content Editor

Leave a Comment
Recently I’ve faced strange issue while working with one Sitecore.NET 7.0.(rev. 130810) solution.  I was unable to open Sitecore content editor. I’ve checked console window to verify if there are any errors. I was getting error: “Error: Load Denied by X-Frame-Options

I’ve troubleshoot the error and found below piece of code in global.asax.cs file:
protected void Application_PreSendRequestHeaders()
        {
            Response.Headers.Remove("Server");
            Response.Headers.Remove("X-AspNet-Version");
            Response.Headers.Remove("X-AspNetMvc-Version");
            Response.AddHeader("X-Frame-Options", "DENY");
        }
Above code logic was added to enhance the security of web application. X-Frame-Options is a good additional layer of protection to prevent clickjacking on your site.  Response.AddHeader("X-Frame-Options", "DENY") was causing the actual issue. DENY option means that  the page can never be framed by any page, including a page with the same origin hence content editor was not opening. I’ve changed Response.AddHeader("X-Frame-Options", "DENY") to Response.AddHeader("X-Frame-Options", "SAMEORIGIN") and I was no longer getting any error while opening content editor. SAMEORIGIN option means that the page can be framed, but only by another page with the same origin.

Comments and suggestions are most welcome. Happy coding!
Read More...

Sunday 15 March 2015

How to create a Window Service for MongoDB

Leave a Comment
From Sitecore 7.5 onwards MongoDB will be used as the new collection database for the Sitecore Experience Database (xDB). In the xDB, the collection database acts as a primary storage or central repository for storing contact, device, interaction, history and analytics information. In this blog post I am going to explain how to install MongoDB on Windows and how to create a Window Service for MongoDB that starts MongoDB automatically at boot time.
  1. Download the latest stable production release installer file (.msi) of MongoDB from the MongoDB download section. Ensure you download the correct version of MongoDB (32 Bit or 64 Bit) for your Windows system.
  2. Double click on downloaded .msi installer file. You can specify a different installation directory if you choose the “Custom” installation option. I’ve installed MongoDB 3.0.0 version to C:\mongodb.
  3. You can set up the MongoDB server as a Windows Service that starts automatically at boot time. If you have installed MongoDB in different installation directory, you have to modify the paths as appropriate in next configuration steps.
  4. Open command prompt with administrator privileges. MongoDB requires a data directory to store all data. MongoDB’s default data directory path is \data\db.
  5. Create directories for your database and log files. Execute below commands in command prompt:
    mkdir c:\mongodb\data\db
    mkdir c:\mongodb\data\log
  6. Create a configuration (.cfg) file. This file includes configuration options for mongod but it must include a valid setting for logpath and dbpath. The following command creates a configuration file, specifying both the logpath and the dbpath settings in the configuration file with respect to your installation directory:
    echo logpath=c:\mongodb\data\log\mongod.log> "C:\mongodb\mongod.cfg"
    echo dbpath=c:\mongodb\data\db>> "C:\mongodb\mongod.cfg"
  7. Create the MongoDB service by executing below command.
    sc.exe create MongoDB binPath= "\"C:\mongodb\bin\mongod.exe\" --service --config=\"C:\mongodb\mongod.cfg\"" DisplayName= "MongoDB" start= "auto"
    sc.exe requires a space between “=” and the configuration values (eg “binPath= ”), and a “\” to escape double quotes. The  following log message will display once MongoDB Service is successfully created:
    [SC] CreateService SUCCESS
  8. Start the MongoDB service by typing below command:
    net start MongoDB
    you’ll get below log message once MongoDB service is successfully started.
    The MongoDB service was started successfully.
Comments and suggestions are most welcome. Happy coding!
Read More...