Monday 7 September 2020

Install Sitecore XP 10 to developer workstation using Sitecore containers with Docker Compose

1 comment

With the launch of Sitecore 10, Sitecore is now officially providing full support for deploying a solution in a containerized environment for the following products:

  • Sitecore Experience Platform 10.0 Initial Release
  • Sitecore Experience Accelerator 10.0.0
  • Sitecore JavaScript Services 14.0
  • Sitecore Experience Commerce 10.0 Initial Release 

Refer to the official documentation to know more about Sitecore containers. In this blog, I’ll explain how to Install Sitecore XP 10 XP0 topology to developer workstation using Sitecore containers with Docker Compose.

Prerequisites

  • Windows 10 Professional or Enterprise version 1809 (2019 LTSC) or later. For enabling process isolation, version 1909 is recommended.
    OR
    Windows Server 1809 or later
  • Download and install Docker Desktop for Windows 
  • Hyper-V should be enabled.
  • 32 GB RAM is recommended.
  • A quad-core or higher CPU.
  • Approximately 25GB of free disk space for Sitecore container images. SSD storage is highly recommended.
  • Sitecore 10 Container Deployment Package


  • Please ensure that the below ports are available and not in use by other applications.
    Required PortRoleDescription
    443TraefikHTTPS proxy
    8079TraefikTraefik dashboard
    8080TraefikHTTP proxy
    8984SolrSolr API and dashboard
    14330SQLSQL Server
  • Sitecore license file

Deploy a Sitecore XP developer workstation

  • Run PowerShell as administrator and stop IIS using the below command. This will ensure that all required ports are available and not in use by another process.
    iisreset /stop
  • Switch to Windows containers mode in Docker for windows.


  • Download and extract the Sitecore Container Deployment Package from the Sitecore Developer Portal and store it on your local directory. Navigate to sitecore-xp0 docker compose folder for xp0 topology. In my local machine, extracted folder path is C:\sitecore\10\SitecoreContainerDeployment 10.0.0 rev. 004346-027\1909\sitecore-xp0

  • Download helper PowerShell script  init.ps1 from Sitecore docker-examples repository. This script will automate few manual steps like encoding the Sitecore license file into base64 string.

  • Move init.ps1 script to sitecore-xp0 topology folder.

  • Open environment .env file. You will observe a few unassigned variables. Every variable is explained in detail in the Installation Guide for a Developer Workstation with Containers.

  • We are not going to populate these variables manually but will use init.ps1 script to initialize these variables. You may update CM_HOST and ID_HOST variables as per your requirement.
  • Open init.ps1 file and change SitecoreAdminPassword, SqlSaPassword, and other parameters as per your need. I’ve not made any changes and kept default values for this installation.
  • Switch back to the Powershell window and navigate to sitecore-xp0 folder. Run the below command to populate the .env file. Make sure to provide the correct path of the Sitecore license file.
    .\init.ps1 -LicenseXmlPath C:\sitecore\license.xml
    
  • The above command will install the SitecoreDockerTools module and populate the environment file. Open the .env file and verify that all the variables are successfully populated.
  • Run the below command to start docker-compose in detached mode.
    docker-compose up -d
  • This command will take some time in completion (based on your internet speed and hardware performance). This command will do a few things:
    • Download all required images from the Sitecore Container Registry
    • Create a default network to use
    • Create a container for each configured service, and
    • Start the containers with their configured entry points
  • After successful installation, you will now have a Sitecore Experience Platform - Single (XP0) instance up and running.
  • Verify installation by using below endpoints
    • Sitecore Content Management (cm): https://xp0cm.localhost
    • Sitecore Identity Server (id): https://xp0id.localhost
    • Sitecore xConnect Server (xconnect): http://localhost:8081
    • Apache Solr (solr): http://localhost:8984
    • Microsoft SQL Server (mssql): localhost,14330
    • Traefik: http://localhost:8079

Cleanup the workstation

You can stop or completely remove a workstation environment by running Docker Compose commands.
  • To stop a Docker Compose environment without removing its contents:
    docker-compose stop
  • To resume a previously stopped Docker Compose environment:
    docker-compose start
  • To remove a Docker Compose environment and all the non-mounted volumes:
    docker-compose down

Installation issues

You may encounter below issues when installing Sitecore XP10 using Sitecore containers
  • PackageManagement\Install-Package : The following commands are already available on this system:'Remove-HostsEntry'. This module 'SitecoreDockerTools' may override the existing commands.
  • Importing SitecoreDockerTools...
    Import-Module : The specified module 'SitecoreDockerTools' with version '10.0.5' was not loaded because no valid module file was found in any module directory.
    Solution: open init.ps1 and use -allowclobber parameter in Install-Module SitecoreDockerTools command.
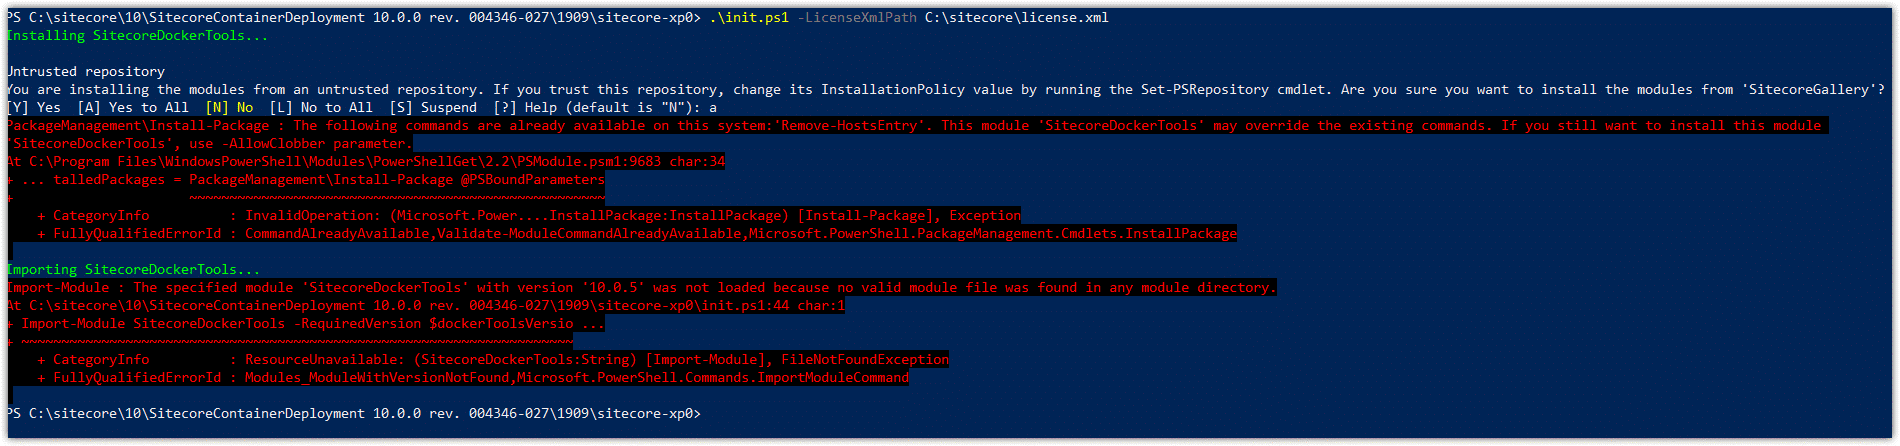
  • ERROR a Windows version 10.0.18363-based image is incompatible with a 10.0.18362 host
    SolutionCheck the prerequisites section. Make sure that you are working on Windows 10 Professional or Enterprise version 1909 or higher.
  • ERROR: for sitecore-xp0_traefik_1 Cannot start service traefik: failed to create endpoint sitecore-xp0_traefik_1 on network sitecore-xp0_default: failed during hnsCallRawResponse: hnsCall failed in Win32: The process cannot access the file because it is being used by another process. (0x20)
    SolutionCheck that all the required ports are available and not in use by another process. Run iisreset /stop command to stop IIS.

References

Comments and suggestions are most welcome. Happy coding!
Read More...

Sunday 22 July 2018

SXA : Disabling asset optimizer not working

1 comment
I’ve previously blogged about disabling Sitecore SXA asset optimizer. Recently, I’ve stumbled upon a situation where we have disabled SXA asset optimizer for SXA site in non-production environment but CSS styles and javascripts are still getting rendered in minified version - optimized.min.js and optimized.min.css.

I’ve made sure that asset optimizer was disabled for local SXA site. For troubleshooting, I’ve also disabled asset optimizer at global level but I have no luck. I’ve verified value of XA.Foundation.Theming.StylesConfigurationId and XA.Foundation.Theming.ScriptsConfigurationId settings and these settings were having correct value assigned.

XA.Foundation.Theming.StylesConfigurationId : The ID of the item that stores the configuration for style asset optimization. 
(/sitecore/system/Settings/Foundation/Experience Accelerator/Theming/Optimiser/Styles)
<setting name="XA.Foundation.Theming.StylesConfigurationId" value="{B3B10434-DACE-483E-B375-49C6D215723D}" />

XA.Foundation.Theming.ScriptsConfigurationId : The ID of the item that stores the configuration for script asset optimization.
(/sitecore/system/Settings/Foundation/Experience Accelerator/Theming/Optimiser/Scripts)
<setting name="XA.Foundation.Theming.ScriptsConfigurationId" value="{4110D103-861E-464F-A258-130A8FCF4C61}" />
Then I’ve peeked into source code of Sitecore.XA.Foundation.Theming.dll and checked implementation of AssetConfigurationReader.
public virtual AssetConfiguration ReadConfiguration()
    {
      AssetConfiguration assetConfiguration = new AssetConfiguration();
      Item designItem = ServiceLocator.ServiceProvider.GetService<IPresentationContext>().DesignItem;
      if (this.RequestAssetsOptimizationDisabled)
        return new AssetConfiguration()
        {
          ScriptsMode = AssetServiceMode.Disabled,
          StylesMode = AssetServiceMode.Disabled,
          RequestAssetsOptimizationDisabled = true
        };
      if (designItem == null)
        return assetConfiguration;
      bool? tristate1 = this.ParseTristate(designItem.Parent[Sitecore.XA.Foundation.Theming.Templates._Optimizable.Fields.StylesOptimisingEnabled]);
      bool? tristate2 = this.ParseTristate(designItem.Parent[Sitecore.XA.Foundation.Theming.Templates._Optimizable.Fields.ScriptsOptimisingEnabled]);
      assetConfiguration.ScriptsMode = this.GetConfiguration(designItem.Database.GetItem(ID.Parse(Settings.GetSetting("XA.Foundation.Theming.ScriptsConfigurationId"))));
      assetConfiguration.StylesMode = this.GetConfiguration(designItem.Database.GetItem(ID.Parse(Settings.GetSetting("XA.Foundation.Theming.StylesConfigurationId"))));
      if (tristate1.HasValue)
        assetConfiguration.StylesMode = !tristate1.Value ? AssetServiceMode.Disabled : AssetServiceMode.ConcatenateAndMinify;
      if (tristate2.HasValue)
        assetConfiguration.ScriptsMode = !tristate2.Value ? AssetServiceMode.Disabled : AssetServiceMode.ConcatenateAndMinify;
      return assetConfiguration;
    }
This code has pointed me to right direction. It seems that designItem was set to null. I’ve opened content editor and navigated to context page item in content tree. In the Designing section, Page Design field value was empty.


I’ve selected appropriate Page Design, saved my changes and published the sitecore item. Voila! Asset optimizer gets disabled and uncompressed CSS styles and javascripts start getting render. Comments and suggestions are most welcome. Happy coding!
Read More...

Sitecore SXA : Disable Asset Optimizer

1 comment
Asset Optimizer is a good feature of Sitecore SXA as it improves the end user experience by minifying CSS styles and javascripts thus reducing the amount of data that needs to be transferred over HTTP request.  If Asset Optimizer is enabled, then Sitecore will automatically generate optimized.min.js and optimized.min.css. It is recommended to enable Asset Optimizer for production environment but sometimes you need to disable Asset Optimizer in non-prod environment (DEV, QA or STAGING) to troubleshoot or debug website scripts and css styles. In this blog post, I am doing to show few ways to disable Sitecore SXA Asset Optimizer:

Disable the Asset Optimizer globally

You can disable Asset Optimizer at global level for all SXA sites. In the Sitecore Content Editor, navigate to /sitecore/system/Settings/Foundation/Experience Accelerator/Theming/Optimiser and for both Scripts and Styles sitecore items select Mode as Disabled to disable Asset Optimizer. Save and publish your changes.

Disable asset optimizer for a specific SXA site

You can disable Asset Optimizer for a specific SXA site. In the Content Editor, navigate to /sitecore/content/…/SXA_SITE_NAME/Presentation/Page Designs. In the Asset Optimization section, in the Styles Optimizing Enabled and Scripts Optimizing Enabled fields set field value as NO to always disable optimization for SXA site.

Disable asset optimizer temporarily for a specific sitecore page

Even with the Asset Optimizer enabled, you can temporarily disable the assets optimisation on any Sitecore page. All you need to do is pass aodisabled=1 as query string parameter to your request url. For example: https://local.mysxaplayground.net/viewlocations?aodisabled=1
It is best practice to disable the Asset Optimizer in non-production environments and to enable it in production environments.
Comments and suggestions are most welcome. Happy coding!
Read More...

Sunday 3 June 2018

Sitecore experience commerce 9 – No Sitecore Commerce Engine log files?

Leave a Comment
Recently while working with Sitecore experience commerce 9, I’d encountered few issues. To resolve those issue, I need to check logs. While troubleshooting I have found that there were no Sitecore commerce engine log files in log folder. I’d recycle application pool and even restarted IIS but no luck. I’d started troubleshooting with config. json file located at C:\inetpub\wwwroot\CommerceAuthoring_Sc9\wwwroot\ and Bingo! I’d hit the nail right on the head. I’ve compared config.json with default Sitecore.Commerce.Engine config.json file and found out that logging configuration section was missing in config.json. I’ve added below configuration in config.json, given write access on log folder to NetworkService account and application pool identity user (CSFndRuntimeUser), restarted IIS and log files started updating in log folder. I’ve done similar steps for CommerceMinions, CommerceOps and CommerceShops websites.
"Logging": {
    "IncludeScopes": false,
    "LogLevel": {
      "Default": "Information",
      "System": "Warning",
      "Microsoft": "Warning"
    },
    "ApplicationInsightsLoggingEnabled": false
  },
  "Serilog": {
    "Using":  ["Serilog.Sinks.Literate", "Serilog.Sinks.File"],
    "MinimumLevel": {
      "Default": "Information",
      "Override": {
        "Microsoft": "Information",
        "System": "Information"
      }
    },
    "FileSizeLimitBytes": 100000000
  }
Comments and suggestions are most welcome. Happy coding! 
Read More...

Sitecore Experience Commerce 9 installation error: The target principal name is incorrect

1 comment
Recently I have stumbled upon in a situation where Sitecore Experience Commerce 9 update 1 powershell installation script didn’t execute successfully and gave the following error:
Importing DACPAC C:\Sitecore\installscCommerce9u1\deploy\Sitecore.Commerce.Engine.SDK.2.1.10\Sitecore.Commerce.Engine.DB.dacpac
Using SQL Server 140 to import DACPAC
TerminatingError(DeployDacpac): "Exception calling "Deploy" with "3" argument(s): "Could not deploy package.""
Initializing deployment (Start)
The target principal name is incorrect.  Cannot generate SSPI context.
System.Management.Automation.MethodInvocationException: Exception calling "Deploy" with "3" argument(s): "Could not deploy package." ---> Microsoft.SqlServer.Dac.DacServicesException: Could not deploy package. ---> Microsoft.Data.Tools.Schema.Sql.Deployment.DeploymentFailedException: Unable to connect to master or target server 'SitecoreCommerce9_Global'. You must have a user with the same password in master or target server 'SitecoreCommerce9_Global'.
   at Microsoft.Data.Tools.Schema.Sql.Deployment.SqlDeploymentEndpointServer.OnInit(ErrorManager errors, String targetDBName)
   at Microsoft.Data.Tools.Schema.Sql.Deployment.SqlDeployment..ctor(SqlDeploymentConstructor constructor)
   at Microsoft.Data.Tools.Schema.Sql.Deployment.SqlDeploymentConstructor.ConstructServiceImplementation()
   at Microsoft.SqlServer.Dac.DacServices.CreatePackageToDatabaseDeployment(SqlConnectionFactory connectionFactory, IPackageSource packageSource, String targetDatabaseName, DacDeployOptions options, ErrorManager errorManager)
   at Microsoft.SqlServer.Dac.DeployOperation.<>c__DisplayClass3.<>c__DisplayClass5.<CreatePlanInitializationOperation>b__1()
   at Microsoft.Data.Tools.Schema.Sql.Dac.OperationLogger.Capture(Action action)
   at Microsoft.SqlServer.Dac.DeployOperation.<>c__DisplayClass3.<CreatePlanInitializationOperation>b__0(Object operation, CancellationToken token)
   at Microsoft.SqlServer.Dac.Operation.Microsoft.SqlServer.Dac.IOperation.Run(OperationContext context)
   at Microsoft.SqlServer.Dac.ReportMessageOperation.Microsoft.SqlServer.Dac.IOperation.Run(OperationContext context)
   at Microsoft.SqlServer.Dac.OperationExtension.CompositeOperation.Microsoft.SqlServer.Dac.IOperation.Run(OperationContext context)
   at Microsoft.SqlServer.Dac.OperationExtension.CompositeOperation.Microsoft.SqlServer.Dac.IOperation.Run(OperationContext context)
   at Microsoft.SqlServer.Dac.DeployOperation.Microsoft.SqlServer.Dac.IOperation.Run(OperationContext context)
   --- End of inner exception stack trace ---
   at Microsoft.SqlServer.Dac.DeployOperation.Microsoft.SqlServer.Dac.IOperation.Run(OperationContext context)
   at Microsoft.SqlServer.Dac.OperationExtension.Execute(IOperation operation, DacLoggingContext loggingContext, CancellationToken cancellationToken)
   at Microsoft.SqlServer.Dac.DacServices.InternalDeploy(IPackageSource packageSource, Boolean isDacpac, String targetDatabaseName, DacDeployOptions options, CancellationToken cancellationToken, DacLoggingContext loggingContext, Action`3 reportPlanOperation, Boolean executePlan)
   at Microsoft.SqlServer.Dac.DacServices.Deploy(DacPackage package, String targetDatabaseName, Boolean upgradeExisting, DacDeployOptions options, Nullable`1 cancellationToken)
   at CallSite.Target(Closure , CallSite , Object , Object , Object , Boolean )
   --- End of inner exception stack trace ---
   at System.Management.Automation.ExceptionHandlingOps.CheckActionPreference(FunctionContext funcContext, Exception exception)
   at System.Management.Automation.Interpreter.ActionCallInstruction`2.Run(InterpretedFrame frame)
   at System.Management.Automation.Interpreter.EnterTryCatchFinallyInstruction.Run(InterpretedFrame frame)
   at System.Management.Automation.Interpreter.EnterTryCatchFinallyInstruction.Run(InterpretedFrame frame)
   at System.Management.Automation.Interpreter.Interpreter.Run(InterpretedFrame frame)
   at System.Management.Automation.Interpreter.LightLambda.RunVoid1[T0](T0 arg0)
   at System.Management.Automation.PSScriptCmdlet.RunClause(Action`1 clause, Object dollarUnderbar, Object inputToProcess)
   at System.Management.Automation.PSScriptCmdlet.DoEndProcessing()
   at System.Management.Automation.CommandProcessorBase.Complete()
The target principal name is incorrect.  Cannot generate SSPI context.
I was able to resolve this issue by making below changes in powershell script (Deploy-Sitecore-Commerce.ps1)
  • Set value as CommerceServicesDbServer = "." instead of CommerceServicesDbServer = "./"
  • Set value as SitecoreDbServer = "." instead of SitecoreDbServer = "./"
You may have to update above DbServer values as per your SQL Server configuration. Comments and suggestions are most welcome. Happy coding! 

Read More...